This is part 7 of a multipart series showing you how to get started with the MetaWear platform. View the contents of the series to easily skip forwards or backwards
In this post we will simultaneously stream data from the accelerometer and gyroscope. This is a typical use case for analysing motion since the combination of data gives a much richer dataset upon which to perform machine learning classification.
We have not yet setup our gyroscope. The process is the same as for the accelerometer in that we need to import the relevant modules. At this point I will also highlight that the Accelerometer we have been using in the tutorial so far is the generic accelerometer class. If we want to start being more precise, we should specify the accelerometer on our board. To quote the docs:
The accelerometer class is a generic class that provides some high level access to an accelerometer. As this class is unaware of any sensor specifics, it only provides limited functionality and only suitable for apps intending to interact with any MetaWear type i.e. the sample app.
Depending on which board you are working with, you’ll want either the MMA8452Q (MetaWear R boards) or the BMI160 (MetaWear R Pro/RG, C/CPRO boards). For our purposes, we’ll use the BMI160.
import com.mbientlab.metawear.module.Bmi160Accelerometer;
import com.mbientlab.metawear.module.Bmi160Gyro;
import com.mbientlab.metawear.module.Bmi160Gyro.*;
import com.mbientlab.metawear.AsyncOperation;
Note that we also import with the * which is to also import configuration methods used later.
We create our variables for use later:
private static final String GYRO_STREAM_KEY = "gyro_stream";
//...other variables
private Bmi160Gyro gyroModule;
private Bmi160Accelerometer accelModule; //updated
And once again use the getModule method within the connected try block of the ConnectionStateHandler:
accelModule = mwBoard.getModule(Bmi160Accelerometer.class); //updated
gyroModule = mwBoard.getModule(Bmi160Gyro.class);
We will be streaming data from both the accelerometer and the gyroscope, so let’s update the UI - we’ll call the switch “Toggle Both” and also add view elements to show the two readings on the screen
In activity_my.xml we move our connect and LED buttons up (by adjusting the marginTop property and removing the centerVertical property) and add two new text views for showing the sensor readings:
<Button
android:layout_width="wrap_content"
android:layout_height="wrap_content"
android:text="Connect"
android:id="@+id/connect"
android:layout_alignParentTop="true"
android:layout_centerHorizontal="true" />
<Button
android:layout_width="wrap_content"
android:layout_height="wrap_content"
android:text="LED on"
android:id="@+id/led_on"
android:layout_below="@+id/connect"
android:layout_centerHorizontal="true"
android:layout_marginTop="80dp" />
<Button
android:layout_width="wrap_content"
android:layout_height="wrap_content"
android:text="LED off"
android:id="@+id/led_off"
android:layout_marginTop="80dp"
android:layout_centerHorizontal="true" />
<Switch
android:layout_width="wrap_content"
android:layout_height="wrap_content"
android:text="Toggle Both"
android:id="@+id/accel_switch"
android:layout_centerVertical="true"
android:layout_centerHorizontal="true" />
<TextView
android:layout_width="wrap_content"
android:layout_height="wrap_content"
android:textAppearance="?android:attr/textAppearanceLarge"
android:text="Accelerometer: 0"
android:id="@+id/textAccel"
android:layout_below="@+id/accel_switch"
android:layout_centerHorizontal="true"
android:layout_marginTop="40dp" />
<TextView
android:layout_width="wrap_content"
android:layout_height="wrap_content"
android:textAppearance="?android:attr/textAppearanceLarge"
android:text="Gyroscope: 0"
android:id="@+id/textGyro"
android:layout_below="@+id/textAccel"
android:layout_centerHorizontal="true"
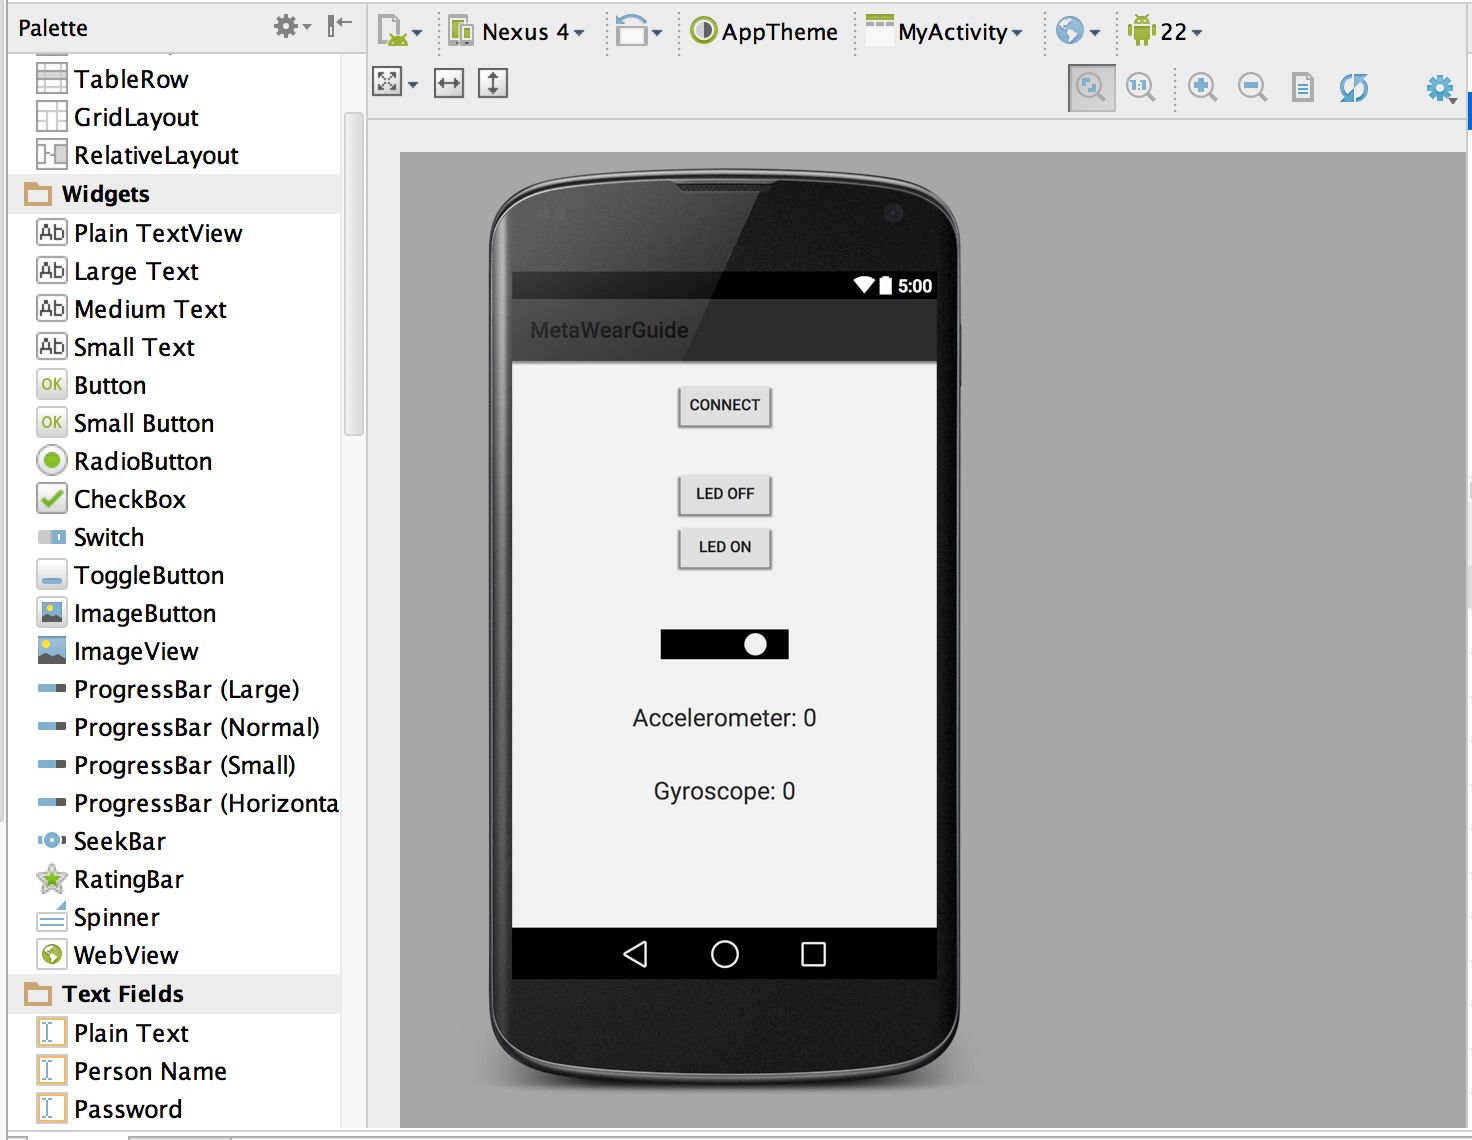
android:layout_marginTop="40dp"/>Your app should now look something like this:
Obviously this tutorial series is not about how to make the app UI look good. Tutorials for that sort of thing are a Google search away.
Now we’re ready to add our routes. We will need one for each sensor. Within the switch isClicked if statement, we add the following:
accelModule.setOutputDataRate(ACC_FREQ);
accelModule.setAxisSamplingRange(ACC_RANGE);
gyroModule.configure()
        .setOutputDataRate(OutputDataRate.ODR_50_HZ)
        .setFullScaleRange(FullScaleRange.FSR_500)
        .commit();
AsyncOperation<RouteManager> routeManagerResultAccel = accelModule.routeData().fromAxes().stream(STREAM_KEY).commit();
AsyncOperation<RouteManager> routeManagerResultGyro = gyroModule.routeData().fromAxes().stream(GYRO_STREAM_KEY).commit();
Next we need to subscribe to the routes we have just setup:
routeManagerResultAccel.onComplete(new AsyncOperation.CompletionHandler<RouteManager>() {
    @Override
    public void success(RouteManager result) {
        result.subscribe(STREAM_KEY, new RouteManager.MessageHandler() {
            @Override
            public void process(Message msg) {
                final CartesianFloat axes = msg.getData(CartesianFloat.class);
                Log.i(TAG, String.format("Accelerometer: %s", axes.toString()));
            }
        });
    }
});

routeManagerResultGyro.onComplete(new AsyncOperation.CompletionHandler<RouteManager>() {
    @Override
    public void success(RouteManager result) {
        result.subscribe(GYRO_STREAM_KEY, new RouteManager.MessageHandler() {
            @Override
            public void process(Message msg) {
                final CartesianFloat spinData = msg.getData(CartesianFloat.class);
                Log.i(TAG, String.format("Gyroscope: %s", spinData.toString()));
            }
        });
    }
});
Note that the stream keys are different for each route. After the second routeManager, let’s add our start code for both sensors:
	//...previous routeManager code
	accelModule.enableAxisSampling();
	accelModule.start();
	gyroModule.start();
} else {
    gyroModule.stop();
    accelModule.disableAxisSampling();
    accelModule.stop();
}
Try running the app - when you tap the “Toggle Both” button, you should see readings for both the Accelerometer and the Gyroscope in the logcat.
Now let’s also update the readings in the UI. Declare our variables first:
TextView accelData;
TextView gyroData;
Then in onCreate hook them up:
accelData = (TextView) findViewById(R.id.textAccel);
gyroData = (TextView) findViewById(R.id.textGyro);
If we just use a setText inside the switch code, we will trigger a WrongThreadException, so we will need to setup a little bit of extra code to avoid this. At the end of the activity, we add:
public void sensorMsg(String msg, final String sensor) {
    final String reading = msg;
    runOnUiThread(new Runnable() {
        @Override
        public void run() {
            if (sensor == "accel") {
                accelData.setText("Accel: " + reading);
            } else {
                gyroData.setText("Gyro: " + reading);
            }
        }
    });
}
And now within our route subscriptions, we can call the sensorMsg method passing in the accel and gyro parameters accordingly:
public void process(Message msg) {
    final CartesianFloat axes = msg.getData(CartesianFloat.class);
    Log.i(TAG, String.format("Accelerometer: %s", axes.toString()));
    sensorMsg(String.format(axes.toString()), "accel"); //note the two parameters
}
//other code
public void process(Message msg) {
    final CartesianFloat spinData = msg.getData(CartesianFloat.class);
    Log.i(TAG, String.format("Gyroscope: %s", spinData.toString()));
    sensorMsg(String.format(spinData.toString()), "gyro"); //note the two parameters
}
Run the app again and you will see the UI displaying the sensor readings for the board accelerometer and gyroscope simultaneously, as well as in the logs.
Hopefully this post clears up one of the main hurdles for getting the most out of your board. Next we’ll look at how we can export our data to a csv.
Note You can view all these changes in the github repository on the branch version-0.6